Showing posts with label OIM PS3. Show all posts

Monday, 2 August 2021

OIM API for adding process task and retry failed task

 In this blog you can find how to add new process task and retry any failed/rejected tasks using API.


Adding new process task:

/*******************************************************************************************
 * @param orcKey
 * @param taskKey
 * @throws Exception
 * Adding new process task.
 * SQL Query to find Task: Task Key (MIL_KEY) select mil_key,mil_name from mil where mil_name='User Principal Name Updated' 
 * and tos_key in (select tos_key from tos where tos_instance_src_field like 'UD_ADUSER.%');
 */
public void addTask (long orcKey, long taskKey)throws Exception{
    tcProvisioningOperationsIntf provAPI = oimClient.getService(tcProvisioningOperationsIntf.class);
    System.out.println("Added :::"+provAPI.addProcessTaskInstance(taskKey, orcKey)+" For ORC_KEY :: "+orcKey);
}


Retry failed/rejected task


/**
 *********************************************************************************************
 * @param ro
 * @param taskName
 * @param taskStatus
 * @throws Exception
 * Retrying Rejected task
 */
public void retryTask (String ro, String taskName, String taskStatus, String uid)throws Exception{
    tcProvisioningOperationsIntf provAPI = oimClient.getService(tcProvisioningOperationsIntf.class);
    
    Map filter = new HashMap();
    filter.put("Objects.Name", ro);
    filter.put("Process Definition.Tasks.Task Name", taskName);
    
    String taskStatus1[] = new String[] {taskStatus};
    Thor.API.tcResultSet rs = provAPI.findAllOpenProvisioningTasks(filter, taskStatus1);
    
    if (rs != null && rs.getTotalRowCount() > 0){
        System.out.println("Total Count :: "+rs.getTotalRowCount());
        for (int i=0; i< rs.getTotalRowCount(); i++){
            rs.goToRow(i);
            if (rs.getStringValue("Process Instance.Task Information.Target User").equalsIgnoreCase(uid)){
                System.out.println(rs.getStringValue("Process Instance.Task Information.Target User")+ 
				" :: "+rs.getStringValue("Process Definition.Tasks.Task Name")+ " :: done");
                provAPI.retryTask(rs.getLongValue("Process Instance.Task Details.Key"));
                break;
            }
        }
    }
}

Adding or Removing child record in OIM using API.

In this blog you can find, how to add or remove child record in OIM accounts using API. In this example I used AD connectors, but it is applicable to any connectors.


Adding child record:


private String APP_INSTANCE_NAME = "ActiveDirectory";
private String CHILD_TABLE_FIELD_NAME = "UD_ADUSRC_GROUPNAME";
private String CHILD_TABLE_NAME = "UD_ADUSRC";

/**
* userLogin: USR_LOGIN value
* accountName: account login name e.g. UD_ADUSER_UID for AD account
* childRecords: String contains List of child data with comma separated.
*/
public void addChildRecord(String userLogin,String accountName, String childRecords) {

    try {
        ProvisioningService provAPI = oimClient.getService(ProvisioningService.class);
        Account acc = null;
        List accList = provAPI.getAccountsProvisionedToUser(getUserKeybyUserLogin(userLogin));
        for (Account account : accList){
            if (account.getAccountDescriptiveField().equalsIgnoreCase(accountName) && 
                account.getAppInstance().getApplicationInstanceName().equalsIgnoreCase(APP_INSTANCE_NAME) &&
                (account.getAccountStatus().equalsIgnoreCase("Provisioned") ||
                account.getAccountStatus().equalsIgnoreCase("Enabled") || 
                 account.getAccountStatus().equalsIgnoreCase("Disabled"))){
                     
                     acc = provAPI.getAccountDetails(Long.parseLong(account.getAccountID()));
                 }
        }
        
        System.out.println("App :: " + acc.getAppInstance().getApplicationInstanceName());
        AccountData accData = acc.getAccountData();
        ArrayList childArray = new ArrayList();

        String[] childRecordList = childRecords.split(",");
        for (int k = 0; k < childRecordList.length; k++) {
            ChildTableRecord newChild = new ChildTableRecord();
            Map val1 = new HashMap();
            val1.put(CHILD_TABLE_FIELD_NAME,childRecordList[k].toString());
            newChild.setChildData(val1);
            newChild.setAction(ChildTableRecord.ACTION.Add);
            childArray.add(newChild);
        }
        System.out.println("childArray size :: " + childArray.size());
        Map> childData = new HashMap>();
        childData.put(CHILD_TABLE_NAME, childArray);
        accData.setChildData(childData);
        acc.setAccountData(accData);
        provAPI.modify(acc);
        System.out.println(" ===== Account Name :: " + acc.getAccountDescriptiveField() + " updated");

    } catch (Exception e) {
        e.printStackTrace();
    }
}


Removing child records

private String APP_INSTANCE_NAME = "ActiveDirectory";
private String CHILD_TABLE_FIELD_NAME = "UD_ADUSRC_GROUPNAME";
private String CHILD_TABLE_NAME = "UD_ADUSRC";

/**
* userLogin: USR_LOGIN value
* accountName: account login name e.g. UD_ADUSER_UID for AD account
* childRecords: String contains List of child data with comma separated.
*/
public void deleteChildRecord(String userLogin,String accountName, String childRecords) {

    try {
        ProvisioningService provAPI = oimClient.getService(ProvisioningService.class);
        Account acc = null;
        List accList = provAPI.getAccountsProvisionedToUser(getUserKeybyUserLogin(userLogin));
        for (Account account : accList){
            if (account.getAccountDescriptiveField().equalsIgnoreCase(accountName) && 
                account.getAppInstance().getApplicationInstanceName().equalsIgnoreCase(APP_INSTANCE_NAME) &&
                (account.getAccountStatus().equalsIgnoreCase("Provisioned") ||
                account.getAccountStatus().equalsIgnoreCase("Enabled") || 
                 account.getAccountStatus().equalsIgnoreCase("Disabled"))){
                     
                     acc = provAPI.getAccountDetails(Long.parseLong(account.getAccountID()));
                 }
        }
        System.out.println("App instance :: " + acc.getAppInstance().getApplicationInstanceName());
        AccountData accData = acc.getAccountData();
        ArrayList childRecArray = null;
        Map> childDataMap = accData.getChildData();
        for (Map.Entry> entry : childDataMap.entrySet()){
            if (entry.getKey().equalsIgnoreCase(CHILD_TABLE_NAME)){
                childRecArray = entry.getValue();
            }
        }
        String[] childRecordList = childRecords.split(",");
        ArrayList childArray = new ArrayList();
        for (String childRecordToDelete : childRecordList) {
            String row_key = null;
            for (ChildTableRecord childRecord : childRecArray) {
                Map childValMap = childRecord.getChildData();
                if (childValMap.get(CHILD_TABLE_FIELD_NAME).toString().equalsIgnoreCase(childRecordToDelete)) {
                    row_key = childValMap.get(CHILD_TABLE_NAME+"_KEY").toString();
                    System.out.println("row_key to be deleted :: " + row_key);
                }
            }

            if (row_key != null) {
                ChildTableRecord newChild = new ChildTableRecord();
                Map val1 = new HashMap();
                val1.put(CHILD_TABLE_FIELD_NAME, childRecordToDelete);
                newChild.setChildData(val1);
                newChild.setAction(ChildTableRecord.ACTION.Delete);
                newChild.setRowKey(row_key);
                childArray.add(newChild);
            }
        }
        
        if (childArray.size() > 0){
            System.out.println("childArray size :: " + childArray.size());
            Map> childData = new HashMap>();
            childData.put(CHILD_TABLE_NAME, childArray);
            accData.setChildData(childData);
            acc.setAccountData(accData);
            provAPI.modify(acc);
            System.out.println(" ===== Account Name :: " +acc.getAccountDescriptiveField() + ": updated");
        }else{
            System.out.println(" ===== Account Name :: " +acc.getAccountDescriptiveField() + ": No data to delete");
        }
    } catch (Exception e) {
        e.printStackTrace();
    }
}

private String getUserKeybyUserLogin(String userLogin) throws Exception {
    UserManager userAPI =
        (UserManager)oimClient.getService(UserManager.class);
    Set retAttrs = new HashSet();
    User userDetails = userAPI.getDetails(userLogin, retAttrs, true);
    return userDetails.getEntityId();
}

Monday, 28 January 2019

OIM PS3 Automated Testing Using Selenium

OIM's UI functionalities can be tested by automation tool like Selenium. There are lot of test cases we need to perform on OIM UI, after doing some developments or implementation (just to verify whether all existing functionalities are working fine). Some time it is very painful job to perform all per-defined test cases again and again. Using Selenium, all the UI based pre-defined test cases can be executed automatically with out any human intervention, and this way we can achieve automated testing on OIM, which is faster than manual testing, efficient and error free.

this blog will give an example of how we can build Selenium test script for OIM.

Selenium test script works on web element of an web page, like button, link etc. If we can identify those element, then it is not a very difficult job to build a test script for a scenario.

for example, I need to perform the below scenario on OIM PS3

************ As Requester ************************
 1. Login to OIM identity console as requester.
 2. Go to catalog and search for a disconnected application "".
 3. Click on Add To cart and checkout.
 4. Fill the application form.
 5. Provide business justification and submit the request.
 6. Logout from the OIM Identity console.

**************** As Approver *********************
 7. Login to OIM identity console as approver.
 8. Go to Pending Approval and search for the requested id generated by requester.
 9. Select the request and approve the same.
10. Logout from OIM Identity console.

**************** As Implementer *******************
11. Login to OIM Identity console as implementer.
12. Go to Pending Fulfillment and Search for the request id generated by requester.
13. Select the request and complete the same.
14. Now go to Track Request and verify the status of the request.

If I need to perform the automated testing of the above test scenario, I have to convert each and every steps with selenium methods. for example I if need to click a button or enter text into a text field, I need to first get the XPath or Element id of those components. Then using those details selenium can identify those element in  browser and perform action (like click or enter data).

in my case //*[@id=\"pt1:_pt_it1::content\"] is the XPath representation of User Login field of OIM login page. similarly //*[@id=\"pt1:_pt_cb1\"] is for Submit button, and so on.


Now here is the full Java code for Selenium Test. For basic of Selenium and how to setup environment refer Selenium HQ

Please check the below video for how the actual testing looks like.


Please note, all the XPaths mentioned in the above code, may not be exactly same for you (before running the test, verify all the XPaths form chrome browser).

Tuesday, 16 May 2017

Upload jar for ScduleTask or JavaTask in OIM 11gR2 PS3 using API

You can upload the ScheduleTask and JavaTask jar in OIM from your custom java applications. Here is the example of the same. similarly you also download, update and delete jar files from OIM database.


public void uploadJar() throws PlatformServiceException{
      
  PlatformUtilsService platformUtilsService = (PlatformUtilsService) oimClient.getService(PlatformUtilsService.class);
        JarElement jarElement = new JarElement();
        jarElement.setName("abcd.jar");
        jarElement.setPath("/tmp/abcd.jar");
        jarElement.setType("ScheduleTask");
       
        Set jarElementSet = new HashSet();
        jarElementSet.add(jarElement);
       
        platformUtilsService.uploadJars(jarElementSet );
        System.out.println("Finish uploading jar" );
    }

Thursday, 11 May 2017

Assign and Revoke OIM Admin roles using API

OIM has several admin roles, which are under the scope of some organizations. in PS3 there is a separate application for managing admin roles, but in the older version this operation was incorporated under organization's life cycle.

Here are the API examples of managing Admin role life cycle like assigning or revoke. This API will work in all the OIM 11gR2 versions including PS3.

 /**
  * Assigning OIM Admin role to a user.
  * @param Userid
  * @param adminRoleName
  */

 public void assignAdminRole(String Userid, String adminRoleName){
 
  try {
  
  
 /**
    * initialize API and get the details of a specified admin role
    */

   AdminRoleService admRoleAPI = (AdminRoleService)oimClient.getService(AdminRoleService.class);
   AdminRole admRole = admRoleAPI.getAdminRole(adminRoleName);
  
   
//Print some details.
   System.out.println("Scope ::"+admRole.isScoped());
   System.out.println("Role Description ::"+admRole.getRoleDescription());
   System.out.println("Role Description ::"+admRole.getRoleId());
  
   //Create a new membership object.
   AdminRoleMembership admMembership = new  AdminRoleMembership();
   admMembership.setAdminRole(admRole);
   admMembership.setUserId(getUserKey(Userid));
  
   
/**
    * Every Admin role scoped under some organization (or organizations).
    * Assigning any admin role you need to set the scope id.
    */

   AdminRoleVO adminRoleVo = admRoleAPI.getAdminRoleVO(String.valueOf(admRole.getRoleId()));
   List<AdminRoleRuleScope> scopes = adminRoleVo.getAdminRoleRuleScopes();
   AdminRoleRuleScope scope = scopes.get(0);
   System.out.println("Admin Role In Scope Organization: "+scope.getInScopeOfOrganizationName()); //printing the organization name


/**
    * If the admin role is not scoped then set the scope id for SYSTEM ADMINISTRATOR organization
    * which is generally 3.  
    */
 
  if (admRole.isScoped()){
    
    admMembership.setScopeId(getOrgKey(scope.getInScopeOfOrganizationName()));
    
   }else{
    
    admMembership.setScopeId("3");
   }
   
    System.out.println("new set Scope ::"+admMembership.getScopeId());
    AdminRoleMembership newMemberShip = admRoleAPI.addAdminRoleMembership(admMembership);
    System.out.println("Admin Role Successfully Assigned to the User: "+Userid+" Key: "+newMemberShip.getUserId());
   
  
  } catch (Exception e) {
   // TODO Auto-generated catch block
   e.getMessage();
  }
 
 
 }

 
/**
  * Revok an Admin Role from user.
  * @param Userid
  * @param adminRoleName
  */

 public void revokeAdminRole(String Userid, String adminRoleName){
 
  AdminRoleService admRoleAPI = (AdminRoleService)oimClient.getService(AdminRoleService.class);
  List<String> adminRoles = new ArrayList();
  adminRoles.add(adminRoleName);
 
 
 /**
   * Get the user and admin role membership object.
   */

  List<AdminRoleMembership> adminMemberShipList = admRoleAPI.listMembershipsForUserByRoleName(getUserKey(Userid), adminRoles);
  AdminRoleMembership adminMemberShip = adminMemberShipList.get(0);
 
  
//revoke admin role.
  boolean status = admRoleAPI.removeAdminRoleMembership(adminMemberShip);
  System.out.println("Admin Role Successfully revoke from User: "+Userid+" Status: "+status);
 }


 /**
  * get user key from given username
  * @param userid
  * @return Userkey
  */

 private String getUserKey(String userid){
 
  String key = "";
  UserManager userAPI = (UserManager)oimClient.getService(UserManager.class);
  java.util.Set retAttrs = new HashSet();
  retAttrs.add(UserManagerConstants.AttributeName.USER_KEY.getId());
 
  User user;
  try {
   user = userAPI.getDetails(UserManagerConstants.AttributeName.USER_LOGIN.getId(), userid, retAttrs);
   key = user.getId();
  } catch (NoSuchUserException e) {
    e.printStackTrace();
  } catch (UserLookupException e) {
   e.printStackTrace();
  } catch (SearchKeyNotUniqueException e) {
   e.printStackTrace();
  } catch (AccessDeniedException e) {
     e.printStackTrace();
  }
  return key;
 }

 
 /**
  * get organization Key from a given Org name
  * @param orgName
  * @return OrgKey
  */

 private String getOrgKey(String orgName){
 
  String key = "";
  OrganizationManager orgAPI = (OrganizationManager)oimClient.getService(OrganizationManager.class);
  java.util.Set retAttrs = new HashSet();
  retAttrs.add(OrganizationManagerConstants.AttributeName.ID_FIELD.getId());
 
  try {
   Organization org = orgAPI.getDetails(OrganizationManagerConstants.AttributeName.ORG_NAME.getId(), orgName, retAttrs);
   key = String.valueOf(org.getAttribute("act_key"));
  
  } catch (SearchKeyNotUniqueException e) {
      e.printStackTrace();
  } catch (OrganizationManagerException e) {
    e.printStackTrace();
  } catch (AccessDeniedException e) {
    e.printStackTrace();
  }
 
  return key;
 }

Sunday, 7 May 2017

Enabling “Request for Other” option for End-User


In OIM 11gR2 PS3 normal end user doesn’t have capability to raise request for other user. By default they can only raise request for themselves. To enable the feature developer need to create a custom admin role with provision account capability and assign user to that role.
Below process will describe the scenario how to create the admin role for end user, so that they can raise request for Application and Entitlements.
  1. Login to identity self-service console using xelsysadm.
  2. Go to manage and click on Administration Roles.


3. Click on create

4. Provide name, Display Name and Description and click on Next


5. Click on Add Capabilities.


6. Select the below capabilities and click on Add Selected (you can also add other capabilities as per the requirements)
  1. Provision Account
  2. Revoke Account Entitlements
  3. View Provisioned Accounts
  4. View Accounts Entitlements
  5. Deprovision Accounts
  6. Disable Provisioned Accounts
  7. Enable Provisioned Accounts
  8. Grant Account Entitlements.


7. Click on Select to select all the capabilities.
8. Click on Next.
9. In the member page click on Add Rule.
10. Add the below rule by Expression (You can also change the rule as per the business need)
      
       User Type = EMP


11. Once the rule is selected, click on Next.
12. In the Scope Of Control page you can specify the Organization that can be managed by this admin role. If not you can simply skip this option and click on Next.

13. In the organization page select the organization which will publish that role. Once done click on Next.


14. Check the summary page and click on Finish.


15. New admin role has been created, and it is visible in the admin role list.


Assign user to Admin Role


1. In the identity self-service page go to Organization

2. Search and open the organization selected during the Admin role creation (To Publish the admin role).

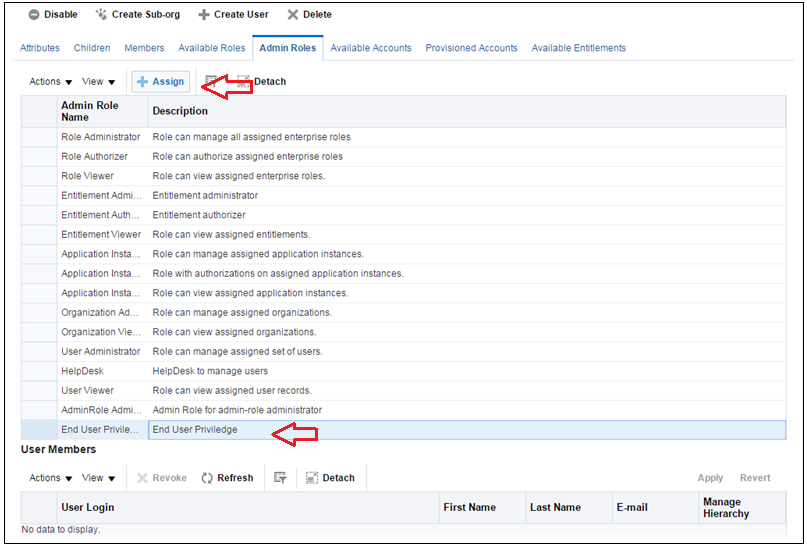
3. Click on the Admin Role tab.


4. Select the newly created Admin Role and click on Assign.


5. Select users you want add as a member of this admin role.


6. Once users are selected close the organization tab.
7. Logout from xelsysadm and login using normal user id.


8. Click on the Request Access you can find Request For Other is appearing


Upgrading OIM from PS1 to PS3

Here is the detail steps of upgrading OIM from PS1 (11.1.2.1) to PS3 (11.1.2.3) in a single instance. Also couple of bugs found during the upgrade process, details of the resolutions are also provided at the appendix.

Click here to get the PDF version

** Kindly post your further queries in the comments below.

Followers

OIM API for adding process task and retry failed task

 In this blog you can find how to add new process task and retry any failed/rejected tasks using API. Adding new process task: /************...